
On-Grid System Design and Calculations – Welcome to the third part of this lecture series. In this lecture, I will teach you how to design your own on-grid solar power system. So, let’s get started with, solar power system part three of five on-grid system design and calculations.
On-Grid System Design and Calculations
The unreached on-grid setup is mainly composed of a solar panel array and an on-grid inverter. I have mentioned previously that the onboard system is the same simplest of the three types of setups. And we just need three steps to do this.

- The load analysis. Here we will just compute for your daily power consumption.
- The sizing of your solar PV panels or your solar array.
- The sizing of your on-grid inverter.
1. The load analysis
So, step one load analysis, the goal here is to determine what your daily power consumption is. This step is really quite simple, just take your electric bill, and check your monthly power consumption, and just divide it by 30 days, and that’s it. So, for example; if we have a monthly consumption power consumption of 170 kilowatts, we just need to divide it by 30 days then our daily consumption is 5.67 kilowatt-hours per day. Now, it is really up to you which month of the bill you will choose. You may choose the month with the highest consumption, or the one with the lowest, or you can even take the average for example.
If you have 12 monthly bills from January to December, you can average it down, and divide it by 30 days then you’ll have your average daily consumption. but we should always remember that the higher compute daily power consumption is the more solar panels that we will need, and of course, we might also need a higher inverter rating we will. Higher inverter rating, and more solar panels. The higher inverter rating, all translates to a higher initial cost, but eventually, this will all pay you back.
2. The sizing of your solar PV panels
Step number two would be the sizing of the solar PV panels. Now, that we have calculated how much power we consume daily, we also need to determine how much sun is your location getting, or what we call sun peak hours. The sun peak hours is the duration at which the intensity of sunlight is 1000 watts per square meter. So, the average sun peak hours are usually around 45 hours, and that value varies as you move away from the equator.
There are also locations where they have longer days, and some will have longer nights. So, this piece of information you need to google yourself, or you can use four hours or five hours if you just wanted to approximate. So, to compute for the required capacity of our solar panels, we should divide the daily consumption by the sun peak hours, and multiple lights are by 1.3. So, that’s 5.67 kilowatt-hours divided by 5 hours, and times 1.3. in theory, our required PV power now, our full photo will take our power is 1.475 kilowatts, or that’s 1475 watts.
Daily comsuption = 5.67 kWh
Sun peak hours = 5 hrs
PV Power = (Daily comsuption/Sun peak hours) x 1.3
PV Power = (5.67 kWh/5 hrs) x 1.3
PV Power = 1.475 kW (1475 Watts)
Now, we should size our solar PV array according to this one. So, suppose we have a number of solar panels in mind, and one of these is this panel with a power rating of 380 watts. To compute how many of this type of solar panels you need to install, we just need to divide the required PV power by this panel’s power rating. So, that would be 1475 watts divided by 380 watts. So, we have 3.88. We can just round it up to 4. So, we need four pieces of this 381 panel.
 PR = 380 W VOC = 48.8 V ISC = 9.94 A Eff = 19.5 % | No. PV Solar Panels = PV Power/PV Panel PR No. PV Solar Panels = 1.475 W / 380 W No. PV Solar Panels = 3.88 No. PV Solar Panels = ˜ 4
|

3. The sizing of your on-grid inverter
The next one is sizing the inverter. Step number three, to size the on-grid invert, we need to take the actual power output of our solar PV array. The solar panel that will be used has a power rating of 380 watts, and then multiply this by the quantity which is four. So, that’s 380 watts times 4, we have a maximum PV power of 1520 watts. This will be the output of our solar panel array. Next is, we need to choose an inverter with maximum power, greater than the computed maximum PV power which is 1520 watts.
PV Panel PR = 380 W
No. Of PV Panels = 4
Maximum PV Power = PV Panel PR x No. Of PV Panels
Maximum PV Power = 380 W x 4
Maximum PV Power = 1,520 W
Okay, so in case we’ve been shopping online, and we found a number of upgrade inverters in the market, and one of them is 2200 watts on-grid inverter. This inverter will be quite sufficient for our requirements.
The next step is, we’ll check if the other inverter parameters such as the voltage input and current input are enough with respect to our solar panel. So, suppose we will connect our solar panels in series. Let’s check its output voltage, so, PV out for a series connection. The voltages are additive. So, that means if we have seen four solar panels, the total voltage output of our solar PV array is around 195.2 volts dc.
PR = 380 W VOC = 48.8 V ISC = 9.94 A Eff = 19.5 % |
Max Vdc Input = 400 V Max Input Current = 10 A |

PV Array Vout (series) = Voc x No. of PV Panels
PV Array Vout (series) = 48.8 Vdc x 4
PV Array Vout (series) = 195.2 Vdc
PV Array Vout (series) (195.2 Vdc ) < Max Vdc Input (400 Vdc )
PV Array Isc (series) (9.94 A ) < Max Input Current (10 A )
The maximum Vdc input of our inverter is 400 volts. So, our inverter can handle this amount of voltage coming out of our PV array, or solar PVR.
Next, we’ll check if the maximum input current is also enough for a series connection. The current is the same that means for solar panels connected in series with each having a short circuit current of 9.94 amps, the current output of the solar array will still be 9.94 amps. This is still lower than the maximum input current of our inverter which is 10 amps. So, we are still okay. In practice, you would want to put more buffer on this. We can, inverter with a maximum input current of around 11 or 12 amps that should be fine.
On-Grid System Design and Calculations
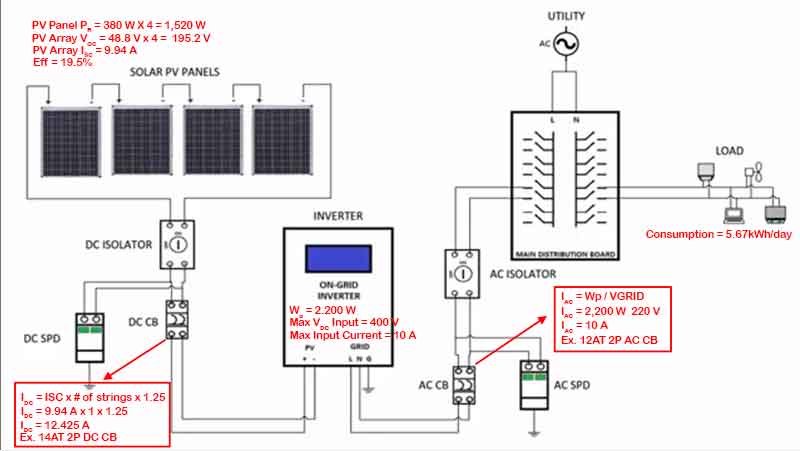
Now that we have all the things that we needed. Let’s build our on-grid solar power system. The on-grid system is quite simple, you have your solar PV array, the solar PV panels, or solar array, which converts the solar energy to electrical energy. The solar array connects the inverter. This one converts DC electrical energy to AC to be used by the appliances. The inverter is then connected to your switchboard, which distributes power into the different appliances or loads. The system is also connected to the grid.

Your utility, as we have determined in step one, the daily consumption is around 5.67 kilowatts per day. In step 2, we have determined the number of solar panels required, and that is for each panel is rated at 380 watts, and for a total power output of 1520 watts. The voltage output of each panel is 48.8 volts, and multiply that by 4 because they are connected in series. So, we have a total voltage output of 195.2 volts.
The current flowing through these panels is 9.94 amps, so that will also be the charging current, not charging current, the input current to our ongoing inverter. In step 3, we have determined the rated power of the inverter by taking the maximum output of our solar PV array, 1520 watts, and based on this, we will choose an inverter with a sufficient power rating. So, in this example, we chose a 2200 watts inverter.
Best Seller

Next step, we shall determine the circuit breaker ratings. So, for the DC circuit breaker, that’s at the output of our solar array, we can take the current output of our solar which is 9.94 amps multiply that by the number of solar array strings. In this case, this is just one string and multiply that with 1.25 for the buffer. The maximum rating of our DC circuit breaker should be around 12.4 to 5 amps.
And since we don’t have this exact rating for the DC breaker, we can settle with the next available value which is a 14 amperes trip two-pole DC circuit breaker. Next one we shall determine the AC circuit breaker at the output of our invert. So, we can calculate this by taking the maximum power rating of our inverter which is 2,200 watts, and divide that by the grid voltage which is 220 volt AC with this our minimum circuit breaker should be 10 amps.
If you can find a tenant circuit breaker then go ahead, but for this example, we chose the next available rating which is the 12 amperes trip two-pole AC circuit breaker. So, that’s all, there is for the on-grid system design, and I hope you gained something from this. The next lecture would be about the upgrade system design and calculations.

View Complete OFF-Grid Product
Other Articles Reviews
- How to connect AC200MAX with Battery Modules B230 or B300
- Off-Grid Solar Battery System – Part 2
- DIY Solar Power System – Part 1
- Complete Off-Grid Solar Power Systems
- Bluetti B300 Battery Test RESULTS
Summary DIY Solar Power Off-Grid System
- Part 1. DIY Solar | Introduction to Solar Power System
- Part 2. DIY Solar | Different Type Of Solar Power Setup (On-Grid, OFF-Grid, and Hybrid)
- Part 3. DIY Solar | On-Grid System Design and Calculations
- Part 4. DIY Solar | Off-Grid System Design and Calculations
- Part 5. DIY Solar | Hybrid System Design and Calculations


