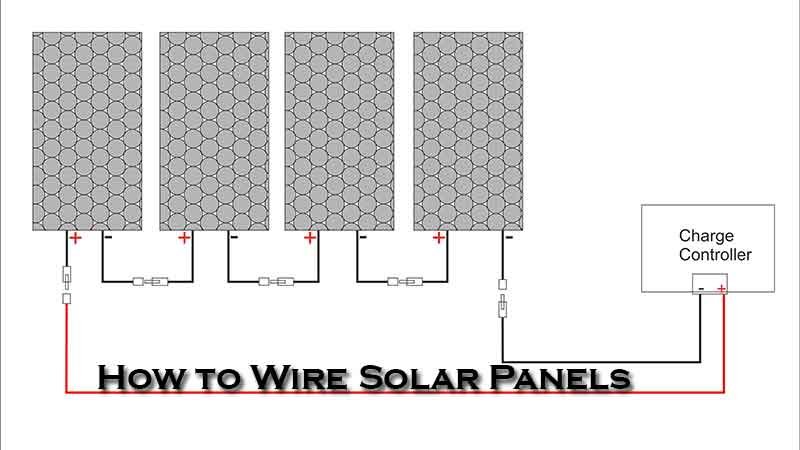
How to Wire Solar Panels in Series – In this article, I’m going to show you how to wire solar panels in series. Now, the last thing before we actually get started, this article is not going to cover what effects wiring in series has on the panels. This is not a theory or a concepts-based article. I’ll cover that in a future article. This video is just a more hands-on practical application of how to actually do the wiring to wire your panels in series.
Table of Contents
How to Wire Solar Panels in Series
Let’s get started. Wiring solar panels in series is just a matter of connecting multiple solar panels together by connecting the positive wire from one solar panel to the negative of the neighboring solar panel. Essentially, just create one big solar panel which leaves us a positive and negative on each end of the series string to take to our charge controller.
For this example, I have two solar panels here. I’m going to take my multimeter to double-check and make 100% sure. I know which wire is positive and which wire is negative. Now, if you feel like you forget which is which, feel free to put a little piece of red tape on the positive wire. The male MC4 connector is generally the positive wire, but it’s always a good idea to check.

And now, that we know which wires are positive and which ones are negative, it’s time to connect some wires. But first, it’s important to cover your solar panels with cardboard or something so that you aren’t working with live voltage. Now, I can take my positive wire from one panel and my negative wire from the neighboring panel. Just push the MC4 connectors together until they click into place. Now, these two solar panels are wired in series.

Next, I need to connect the wires that would go to the charge controller. So, I would connect a red wire with an MC 4 connector on the end to the positive side of the solar panel, and a black wire with an MC 4 connector to the end with the negative side. Now, these two wires would be the wires that get connected to the charge controller through a dual pole disconnect which we’ll talk about the part in the future.
 |  |
Today, we’re just focusing on how to actually wire the panels together. Now, the process of wiring all this together is the exact same. Regardless, if you’re using two panels or ten panels, positive wires, two negative wires for each of the neighboring panels, and then the positive and negative wires on each end, go to feed the charge controller.
Now, I’m going to put some pictures of multiple solar panels series wired configurations that you can use for reference as needed in your own project. Now, if you need to space your panels further away, then the built-in wires on your panels will reach. It’s totally fine, you just need to make a panel interconnect wire which is simply an extension wire with the male MC 4 connector on one end, and a female MC 4 connector on the other end, to bridge the gap between the panels, and that’s all. There is to wearing solar panels in series.
Other Articles Review
- Complete Solar RV System Packages
- Solar Energy Review: Renewable Energy
- Solar Generator For House
- Solar Power System For Home: Guideline
- All in One Solar Generator
Best Seller


[…] How to Wire Solar Panels in Series […]
[…] How to Wire Solar Panels in Series […]
[…] Wiring and Mounting Hardware: These are essential for connecting and installing the various components of the system. How to Wire Solar Panels in Parallels? Or How to Wire Solar Panels in Series? […]
[…] Install your solar panels on a sturdy and durable mounting system, either on your roof or on a ground-mounted racking structure. Make sure the panels are positioned at the optimal angle and direction to maximize sunlight exposure throughout the year. […]