How to Wire Solar Panels in Parallel – In this article, I am going to teach you how to wire solar panels in parallel. Before we get started, this article is not going to cover what effect wiring in parallel has on the panels. This is not a theory or concepts-based article. I’ll cover that in a future article.
Table of Contents
How to Wire Solar Panels in Parallel
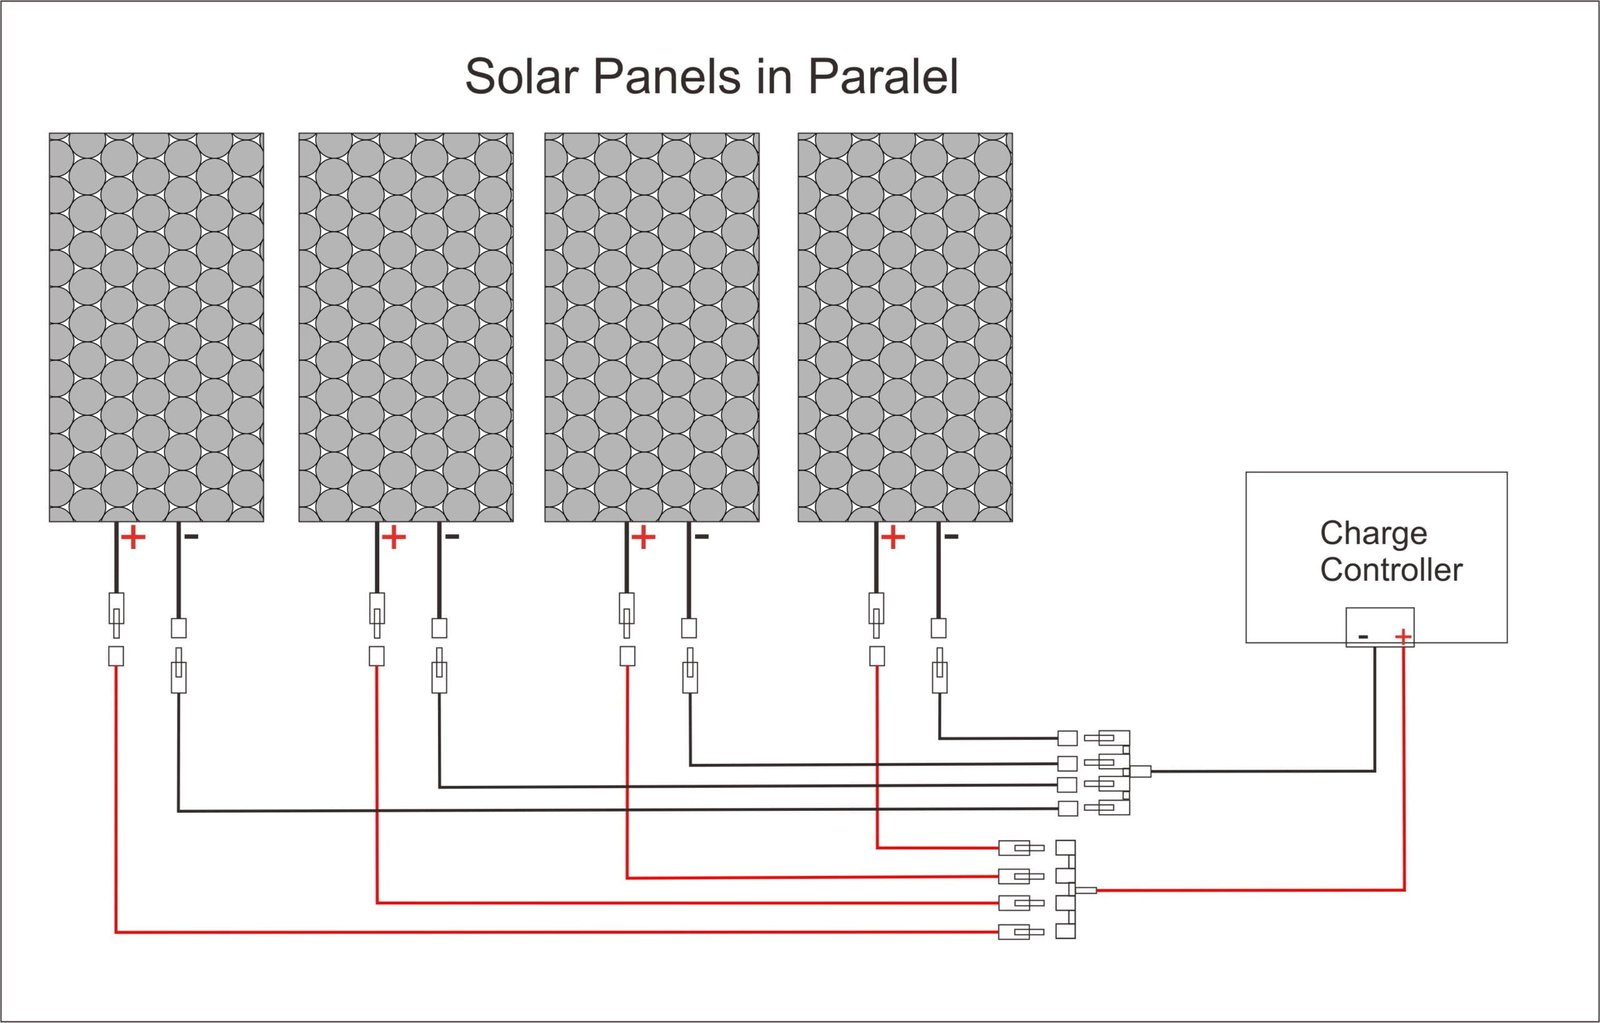
This article is going to be a hands-on practical application of how to actually do the wiring to where the panels are in parallel. Let’s get started. Now, wiring solar panels in parallel is just a matter of connecting multiple solar panels together by connecting the positive wires together, and the negative wires together into a single pair of positive and negative wires to take to the charge controller.
Step By Step Wiring
1. Check Wires Pole
Now, I have two solar panels from Rich Solar, and I’m going to use them as an example. First, I want to use my multimeter to double-check and make 100% sure that I know which wire is positive and which wire is negative. Now, if you feel like you’ll forget which is which, feel free to put a little piece of red tape or something on the positive wires.
The male MC4 connector is generally the positive one. But it’s always a good idea to check. Now, that we know which wires are positive and which wires are negative. It’s time to connect some wires, but first, it’s important to cover your solar panel with cardboard or something, so you aren’t working with live voltage. Now, I can take all of my positive wires from the solar panels, and combine them together with a two-to-one MC4 branch connector.

2. Wiring Connections
Next, I can do the same thing on the negative side. Now, both of the panels have been effectively wired in parallel. I can connect a positive and negative wire with an MC4 connector on each end to the branch connectors. These two wires would go down through the roof to the solar charge controller.
Now, what happens if we have three solar panels? The same story to start, double-check which wires are positive, and which wires are negative. And then cover up the panels. This time we want to use three to one MC4 branch connectors, but this time depending on the size of the panels.
There’s a pretty good chance that we’re actually going to need to introduce fuses into the system. And to do that, I have these MC 4 fuses. I’m going to attach a fuse to each of the positive solar panel wires and attach the fuse to the branch connector. All the negative wires get connected to the negative three to one MC4 connector.
And then, two three-to-one branch connectors get connected to the positive and negative wires going to the charge controller. Now, with four panels, there’s nothing different except that we’re going to use a four-to-one branch connector. And if at any point, your solar panel wires don’t reach the branch connector, it’s totally fine to make an extender cable with a male MC4 connector on one end and a female MC 4 connector on the other end.
Now, I know this article is going to spark some questions about when to use fuses versus when to not use fuses. But that’s going to be a conversation for a totally different article. This article is only about how to actually do the physical wiring. Now, I hope you found this article helpful.
Other Articles Review
- How to Wire Solar Panels in Series
- Complete Solar RV System Packages
- Solar Energy Review: Renewable Energy
- Solar Generator For House
- Solar Power System For Home


[…] How to Wire Solar Panels in Parallel […]
[…] How to Wire Solar Panels in Parallel […]
[…] Hardware: These are essential for connecting and installing the various components of the system. How to Wire Solar Panels in Parallels? Or How to Wire Solar Panels in […]